Showing posts with label July 2011. Show all posts

Wednesday, July 27, 2011

"Straighten-Up" - Tin Tower Organizers

Tin Tower Organizers
by Wendy Switzer
Level: Intermediate
Time to Complete: 4-6 hours

Teen make-up & hair accessory organizer
Square & Circle tins used, two lid bottom, rod top extension with doc clip, paint splatter & vinyl accents


Supplies:

  • Cookie Tins
  • Spray Paint - Primer and color desired
  • Threaded Rod 3/8"- 1/2"
  • Washers & nuts - to fit onto threaded rod
  • Drill & drill bit - size of the threaded rod
  • Flat drill bit - size needs to be the width of the washer
  • Newspaper, marker and pencil
  • Scissors
  • Wood scrap...plywood, pine, etc.
  • Jigsaw
  • E6000

Instructions:

  1. Wash tins and dry completely.
  2. Decide how many tins and lids will be used for your project
  3. Paint tins, lids, washers and bolts with primer and set aside to dry completely. 
  4. Next paint with desired color and allow to try for 1-2 hours (depending on the temperature)
  5. Trace the bottom of each tin onto the newspaper and cut out the circle 1/4" INSIDE of the line.  Fold the paper circle in half and then in half again.  Snip off a small piece of the tip of the "pie" piece of folded paper you have created. 
  6. Place paper circle inside the tin and use a pencil or marker to make a mark onto the tin center using the hole in the center of the paper circle. 
  7. Do steps 5 & 6 for each tin and lid that you will use.
  8. Cut a piece of wood to fit inside the largest lid.  Drill a hole into the wood that goes only HALF way through the thickness of the wood.  The hole needs to be as wide as the washer.  The washer and nut will be recessed into the wood and when the nut is tightened (step 12), it will be flush with the wood so that the base sits level.  This will give your tin tower good stability.   You can also use E6000 to glue the wood into the lid permanently.  I also like to use a bit of E6000 on each nut to make sure it is "locked" into place. 
  9. Drill a hole into the center of each tin piece using the center mark as your guide. You may want to punch a hole in the center of the tin with a nail, first, to give the drill bit something to grab onto and keep your hole centered. 
  10. BOTTOM/BASE ideas:  You can do many things to create your base/bottom.  You will notice that I did not do any of the bottoms the same.  You can use multiple lids to create additional organizing space  as your base.  Turn lids upside down on top of each other, layer lids, etc.  Be creative and design something that will work best for your individual needs.
  11. To begin assembling your tin tower, twist a nut onto the threaded rod and twist it up about 6". Next place a washer onto the threaded rod and then your tin.  The largest (bottom) tin should be placed onto the rod so that the nut and washer are on the INSIDE of the tin.  
  12. Place another washer and then twist on another nut.  Using your wrenches (one wrench on each nut...inside the tin and bottom of the tin) tighten as much as possible.  
  13. Next place the next items in this order...nut, washer, largest tin lid (upside down), wood piece, washer and nut.  
  14. Now with your base complete, you are ready to stand it up and begin assembling the rest of your organizational tin tower.
  15. Assemble the rest of your tower in this order...nut, washer, tin, washer & nut.  This order of items can be used as many times as needed to create the tower height desired.
  16. FINISHING the top:  You can finish off your tower in many ways....1.  You can have a small tin for the top.  2.  You can have a lid as the top.  3.  You can finish off your tower by having the rod extend above your top tin (photo 1A) and glue a large document clip onto the top of the rod.  Let dry over night and this will give you a place to display recipes, photos, reminders, etc.  
  17. Finish off with stickers, vinyl lettering/shapes/names, tin contents, embellishments, etc.

 1A
BLACK: Three tin craft room tower. Two lid bottom and top extending rod with document clip
BROWN:  Three tin planter tower, textured paint to resemble sandstone, one lid for the base
 1B
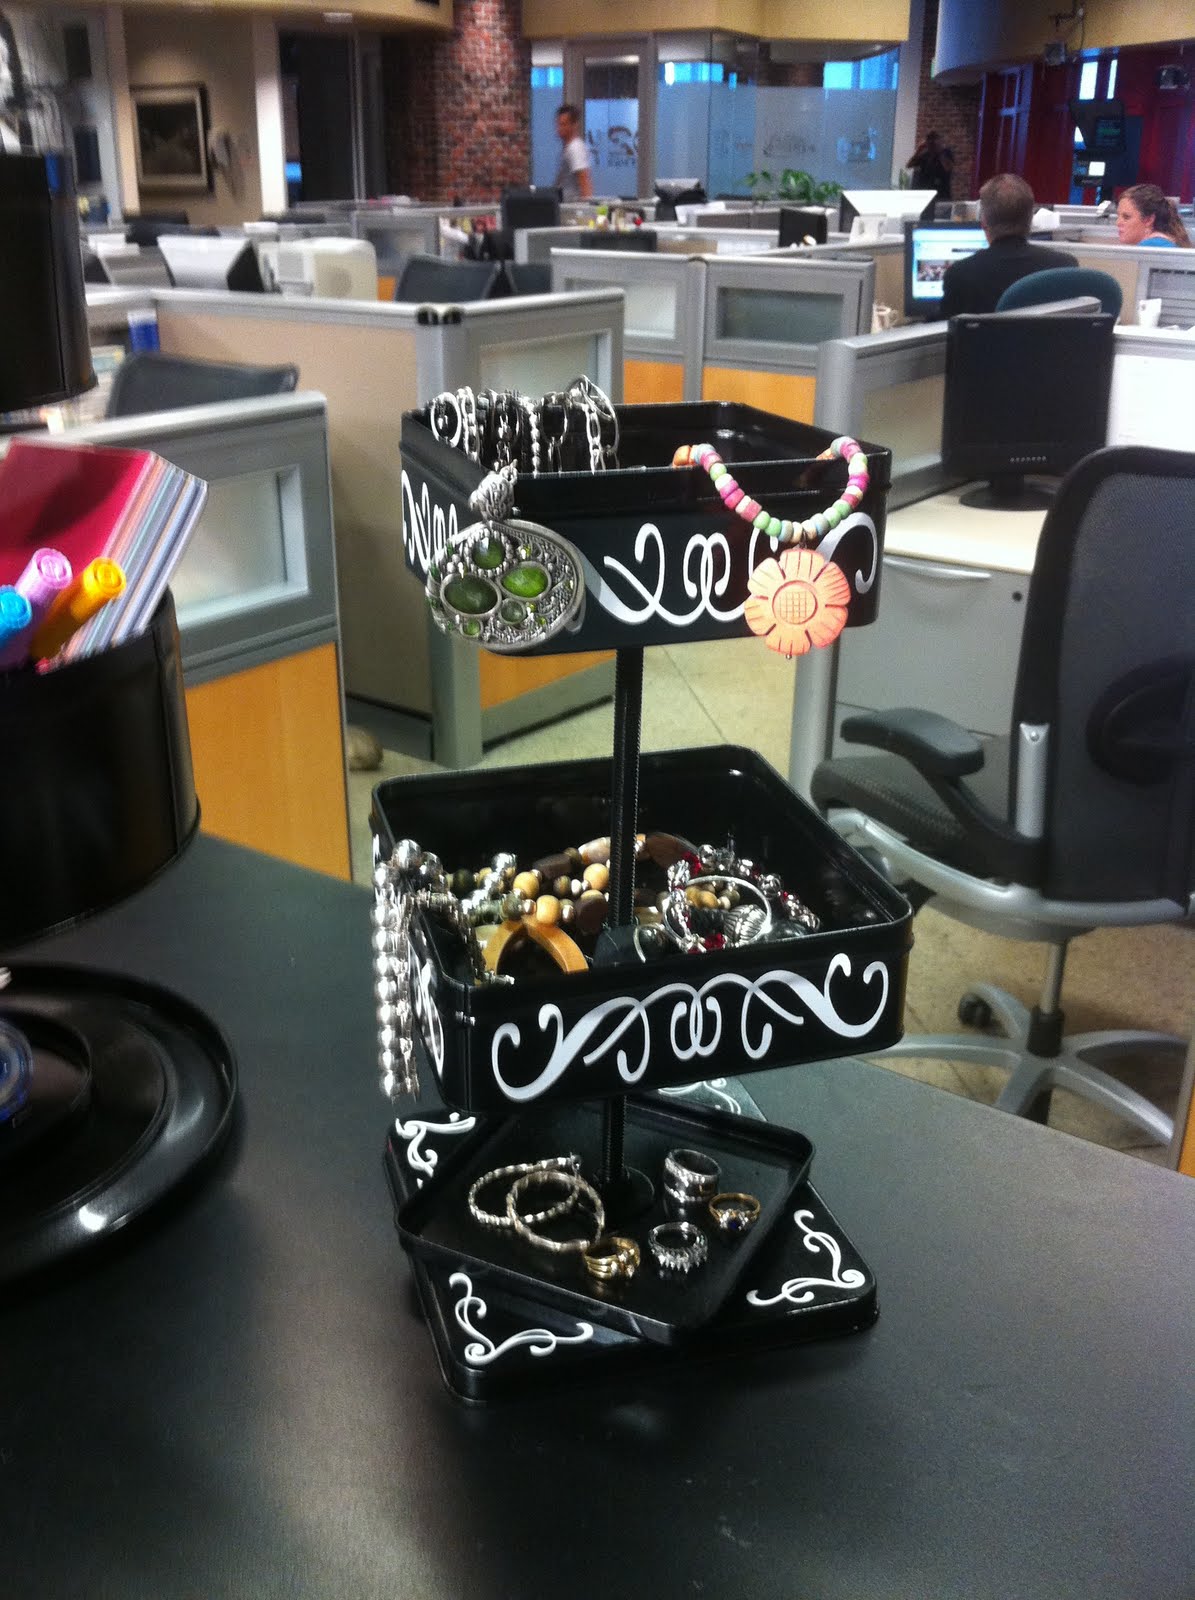
Two tin organizing tower:  Offset, two lid base, embellished with vinyl filigrees

3A
4 tin craft tower:  Two lid base

4A
Produce/Table top tower: Used "flecking" glitter spray paint, placed the bottom tin on an upside down lid as the base.  Used a small lid as the very top.

Check out www.connect2utah.com to watch the tv demo segment :)

Wednesday, July 6, 2011

Reunion Ideas for all ages!

Reunion FUN!

Here are some great ideas for pulling off a stress free family reunion.  Getting everyone involved with simple activities will provide hours of entertainment for all.  It also provides "busy time" for younger people so those who wish to socialize can do so without much interruption.


Easiest way to Tye Dye tshirts
Tye dying tshirts is a great reunion past time, but can be a daunting and messy task.  Here is a simple and mess free way to achieve similar results.


Supplies:

  • t shirts
  • Rit dye (multiple colors)
  • small spray bottles (your local Dollar stores carry the perfect size)
  • table covering/newspaper
  • paper stencils (optional) covered with clear acrylic spray
  • rubber bands
Instructions:

  1. Cover table with plastic, newspaper or paper table covering.
  2. Scrunch t shirt together
  3. Spray with dye
  4. You can repeat steps 2 & 3 as many times as necessary or to achieve the look desired using multiple colors.
  5. You can also use pattern stencils made from paper (spray with clear acrylic spray to make them durable for multiple uses)
  6. You can also take sections of the t shirt and tie with a rubber bands.  Spray with the dye until the section is saturated.  Remove rubber band and you have a unique look and design. 


Boondoggle
This is a fun activity that has been around for generations.  So many fun and unique new ways to keep you busy for hours.  Absolutely THE best patterns for Boondoggle is http://boondoggleman.com/.  Amazing patterns EASY instructions and so simple that kids can follow along!


Supplies:

  • Rexlace or plastic lacing
  • Design instructions from website mentioned above
  • key chains, safety pins, etc. (things to hook to your boondoggle)
Instructions:
  1. Follow instructions and create unique and fun boondoggle crafts.

Friendship Bracelets

These are a fun and easy activity for ALL ages.  A great activity to pass the time, have something to do while just sitting around, etc.  Best patterns are available at  http://www.peacepattern.info/ or http://www.how-to-make-jewelry.com/friendship-bracelet-instructions1.html


Supplies:
  • Embroidery Floss - multiple colors
  • Safety pin 
Instructions:
  1. Select pattern and number of colors of embroidery floss desired/needed to create your bracelet.
  2. Secure floss to safety pin and follow pattern


Ancestor Sharing
Doing some research of ancestors can be, not only fun, but extremely educational for everyone involved.  Bring photographs, journals, family stories, etc. to display and share.  Learning about your family history can be a great way to connect with everyone attending the reunion, regardless of age.

Great sites for family history:  https://www.familysearch.org/   OR   http://www.ancestry.com


Personalized Table Cloth

Make an easy camping table cloth with sentimental value and a personalized touch.


Supplies:
  • twin sheet
  • fabric crayons, markers or pens
  • iron to set designs
  • sewing machine or serger
Instructions:
  1. Remove all the folded edges off of the sheet and serge or finish the edges.
  2. Have everyone create their own unique art work on the cloth.
  3. Add their initials or names next to their art work.  You can also add the age and date at well.
  4. Set with an iron. Ready to use!

Wednesday, June 22, 2011

Patriotic Party Decor

Patriotic Party


Supplies

  • Cardstock - Patriotic in nature
  • Scotch glue dots 
  • Paper trimmer & scoring tool
  • Black ink
  • Wire
  • toilet paper/paper towel/wrapping paper roll
  • Scissors
  • Dowel
  • Empty soup can - large
  • Raffia
  • Craft cording - red, blue & silver
  • Optional: Electronic Paper cutter 
  • Scotch 3-D glue dots
  • Craft wire - red, blue & silver

Instructions:

INVITE:  

  1. Invitation holder: Cut the empty cardboard roll to 4" size (if necessary) and cover with decorative paper. Make sure to cut the paper 2" longer than your roll.  You will want 1" of paper to hang over each end.  Cut slits into the paper and glue to the INSIDE of the tube. 
  2. Invitation: Add a piece of blue paper and a star to the outside and ink, if desired. 
  3. Cut a piece of red cardstock 3.5" X 3.5".  Cut decorative piece of paper 3"X3". Ink along all the edges with the black ink.  Cut three 3" pieces (one each color) of the craft cording.  Fray one end of each color.  Adhere the decorative piece onto the solid red piece, but secure the cording at the top, middle edge of the card and between the two pieces.
  4. Add party details, fold into thirds and slide into holder.  


USA TABLE BANNER:
  1. Cut 3 triangle pieces of blue card stock, 3 sizes, gradually smaller.  Sizes will vary, but the sizes I used are:  Large triangle, top edge 10" and sides 12", Medium triangle, top edge 7" and sides 10" and the smallest triangle, top edge 5" and sides 7".  Ink edges
  2. Cut 3 triangle pieces of red card stock, just smaller than the blue sizes. Ink edges
  3. Adhere the red triangle pieces to the blue pieces and set aside.
  4. Cut 3 pieces of patterned paper measuring 3"X12".  Ink edges.  Score each piece all the way across (length wise) at every 1/4".  Redirect every other fold backwards so that when you fold it all together it resembles a tightly folded fan (you know the kind of fans we all made as kids with a piece of paper...folding it back and forth, back and forth).  
  5. When all the folds are completed, smooth flat onto a hard surface and using a glue runner, place glue along ONE of the LONG edges (glue will be running ACROSS each fold). Squish your folds back together and one end will be glued together just like a fan now. 
  6. Now that you have 3 folded, glued and resembling mini fans, glue the long edges of each piece together so you now have a circular fan.
  7. Cut 2 pieces 2"X10" and 1 piece 1.5" X 8".  Ink edges. With these pieces repeat steps 4-6 above to create the other two circular fans needed to complete this project. 
  8. Glue the largest circular fan to the largest triangle, medium on the medium, etc. 
  9. Cut out 2 sets of the "USA" letters.  Letter U needs to be 6", S needs to be 4" and the A needs to be 2". Ink edges. Use the 3-D glue dots to glue the 2 like letters together...you can off center them just a bit as shown in the photo.  Adhere onto the top of each fan...U on the large, S on the med and A on the smallest.  
  10. Cut out 7 stars and ink all the edges.  Adhere to the top corners of each triangle piece. 
  11. Glue triangles onto the dowel in the correct order...U,S,A.  
  12. Cover soup can with decorative paper, cut a 4"X3" blue card stock and adhere to the front and finish off with the remaining star.  
  13. Rocks in the bottom of the can will help it stand on its own.  Place bottom end of the dowel into the rocks, fill the can with raffia and you are done!

FIREWORK TABLE DECOR
  1. For each 3-D firework, you will need to cut 3, 15" pieces of wire...one of each color.
  2. Wrap each piece of wire around a marker, pencil, dowel, etc. to to create a twisted piece. Set aside
  3. Cut out 8, 8" flowers from red card stock and 8, 6" flowers from blue card stock.  
  4. Fold each flower in half equally.  Make sure you fold each color of flower the exact same way.
  5. Place glue all along ONE OUTSIDE of a red folded flower.  Adhere it to another red folded flower so that it matches up and glues together perfectly.  Continue to glue another flower, and another, etc. until all of your flowers have been added.  Glue the last flower to the first to create your 3-D firework.
  6. Do the same thing with your blue flowers.  Additional sizes can be created as well.
  7. Cut out a star for each 3-D firework, ink the edges and add it to the middle of each firework. 
  8. Secure 3 twisted pieces of wire (one each color) into the top center of each firework. 
  9. Smaller flowers can be cut to create a miniature name card for each guest. (photo)