

Thursday, February 18, 2016
Popcorn Bar
I love being able to speak with engaged couples and make their vision become a reality. Weddings DO NOT need to break the budget in order to be tastefully elegant. The large 2'X4' chalkboard hanging above was made for under $12...mimicking the one I found at Hobby Lobby for $69! Crates were washed to give them an old look by using steel wool soaked in vinegar. Entire Popcorn bar (minus the popcorn cost...that will vary with invited guests)....$140. Popcorn Bar set up from various caterers (NOT including the popcorn)...$260~$425! Save yourself the money and DIY! :)

Monday, August 13, 2012
Don't forget...this week...

Senior Day ~ Wednesday, August 15, 2012
- Senior Health Fair 11:00 am - 2:00 pm FREE health screenings (see website for complete list)
- Seminars
- 11:30 am - Preventative health Screenings, J. Allen Francis, M.D.
- 12:30 pm - Managing Diabetes, Cindy Johnston, RN, MSN
- Complimentary lunch for Senior Citizens - By reservation
- Pick up lunch voucher NO LATER THAN AUGUST 10th at Apple Tree Assisted Living, in Kaysville OR Apple Village Assisted Living, Layton.
- Bingo - 2:00 pm
- Ice-Cream Social & Entertainment - 3:00 pm Music provided by "Sunshade & Rain"
Guest Presenter "Utah's Crafty Chick", Wendy Switzer
Living Arts Building
- Friday, August 17, 2012 - 3:00 pm
- "Re-Invent" your creative thinking - Economy conscious crafting
- Free Make-N-Take
- Saturday, August 18, 2012 - 3:00 pm
- Crafting is for everyone - Generation to Generation
- FREE Make-N-Take
Wednesday, August 1, 2012
WOOHOO!!! I am happy dancing today! FINALLY have control over my site again...and to the person who decided that they would hack my blog...shame on you!
I will try to get the past projects uploaded as quickly as I can. I know you have been VERY patient...more patience than one should have to show...so THANK YOU!
Happy Crafting! :)
I will try to get the past projects uploaded as quickly as I can. I know you have been VERY patient...more patience than one should have to show...so THANK YOU!
Happy Crafting! :)
Wednesday, February 8, 2012
Book Folding 3-D Art
Book Folding 3-D Art
by Wendy Switzer
KUTV Channel 2 - February 8, 2012
Level of Difficulty: Intermediate to Advanced
Time to complete: 2-6 hours
This project was lots of fun to create, but it is time consuming. Do not think that it is something that you can create in 30 minutes! Plan on spending at least 4-5 HOURS on these projects. Some can be completed in as little as 90 minutes, but the more complex it is...the more time AND patience it will take! :)

Supplies Needed:
- Old Book...or one from the local thrift or dollar stores
- bone folder
- adhesive
- PATIENCE!!!


Standing up........................................or laying down
both options give you a unique look

Breast Cancer ribbon in the center
(lighting was not good and this was the first attempt at the ribbon...sorry)

You can even create letters, names, etc.
The instructions for these are extremely complex and difficult to get from my head to the paper. Please be patient and I will have them up as soon as I can.
Thank you for your continued patience as we try to figure out what is wrong with our pictures and instructions not showing up.
We have done something different with today's post that will (or SHOULD) automatically post at 1:00pm. If all goes well, and it DOES post at 1pm, we will know what to do to get the last 3 segments fixed and posted as soon as possible. :)
Thanks again...
Happy Crafting!
We have done something different with today's post that will (or SHOULD) automatically post at 1:00pm. If all goes well, and it DOES post at 1pm, we will know what to do to get the last 3 segments fixed and posted as soon as possible. :)
Thanks again...
Happy Crafting!
Wednesday, January 4, 2012
Cricut Wednesday
NEW Cricut Cartridges!!!
Cricut has a few fun new cartridges and so I thought I would combined two of my favorites in today's craft
LAYERED SNOWFLAKE

Supplies:
- Cricut Machine, cutting mat, etc.
- Cricut Cartridges: "Ribbons & Rosettes" and "Damask Decor"
- Adhesive
- Ruler
- Blue and white cardstock
Instructions
- Start by cutting pieces from your "Ribbons & Rosettes" cartridge:
- ONE 7 1/2"
from white cardstock - SIX 2 1/2"
from blue cardstock - ONE 4"
Rhinestone/Medallion Shadow/Shift from white cardstock - ONE 3 1/2"
Rhinestone/Medallion Shadow/Shift from blue cardstock - ONE 3"
Rhinestone/Medallion Shadow/Shift from white carstock


- Next cut your piece from the "Damask Decor" cartridge:
- ONE 3"
using blue cardstock


- Fold your six
pieces along the cutting lines making an accordion "back and forth" fold. - Adhere the ends of each piece and then secure the first piece to the last making a circle of folded papers which is now your medallion
- Adhere your medallion to your largest white piece
- Layer the remaining white and blue circle pieces onto each other according to size.
- Secure your
blue piece to the top and you are finished.
Many of the Cricut Cartridges can easily compliment each other. Give it a try...see what great things you can create using 2-4 cartridges. I would love to see what you come up with! :O)
Happy Crafting!
Wednesday, December 28, 2011
Start A Warm New Years FLEECE Tradition
Fun with Fleece
Supplies


 SCARVE
 HEADBAND/EAR WARMER


 HAT
HAT


Supplies
- Fleece
- Fabric Scissors
Directions:
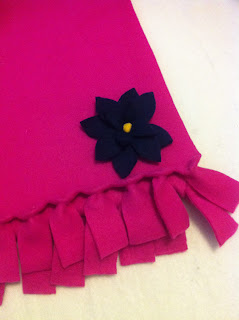
FLEECE TOTE
1. Cut two pieces of fleece 14”X30”
2. Keeping both pieces of fleece together, cut 1 ½” slits all along the bottom of one end of the rectangle. As you reach the edge you will cut out a piece approximately 1 ½” square.
3. Continue to cut slits up each side of the rectangle until you have about 14” of each side cut.
4. Cut a strip off of the remaining length of each side of the rectangle. These will be the handles.
5. From the INSIDE -TOP of the rectangle cut out the center pieces. Make sure you DO NOT cut down further than the top slits on each side.
6. Next, cut a little snip in the top middle of each fringe piece you cut. You want to make the snip just even with the ends of each of your original cuts (that make the fringe).
7. Next take both pieces of a fringe piece and push it through the slit in the top of the fringe. Pull snuggly and securely.
8. Do this step with each of the fringe pieces.
9. Tie the ends of the handle pieces into square knots at the top.
10. To make the flowers…cut two different sizes of squares. I used a 4” and a 3”. Make little slits on each of the sides almost to the center.
11. Fold the square in ½ and take out little triangle pieces from each side as shown
12. You can cut away more from each petal to shape as desired.
13. Layer flowers on top of one another and cut two slits in the center about ¼” apart from each other.
14. Cut slits in desired location on the purse.
15. Line up slits in flowers and slits on purse.
16. Cut a ½”X4” piece of fleece from your scraps. From the inside of the purse, push each end of the scrap fleece through the slits in the purse and flower pieces.
17. From the front side of the purse, tie the scrap piece into a square knot and clip ends to desired length.


1. Cut a single piece of fleece 8”X36”.
2. Along the 8” ends, cut in about 3”…every 1”.
3. Follow steps 6 & 7 to finish off fringe
4. You can follow steps 10-17 if you desire to add flowers

1. Cut a piece of fleece 3-5” wide by (circumference of head + 2”). Make sure you cut the fleece so it is cut on the stretchy length…meaning you want your rectangle to “give” or stretch some.
2. Cut the end pieces as shown…making and indent and “raindrop” shape in the middle end.
3. Cut a slit in one of the raindrops as shown.
4. Slip one of the raindrops through the other as shown. Set aside
5. Cut flower as you did in steps 10-17 above, only make 3 flower pieces.
6. Push raindrop pieces through the slits in the flower.


1. Measure your head and divide by 4. Add 2” to that measurement and that is the bottom of the triangle pieces you will cut. You need 4 pieces of fleece…all the same color or use two coordinating colors. You can make the hat as long/tall as you desire.
2. Cut fringe along the two sides of the triangle as you did in steps 6-7 of the purse.
3. At the very top of the triangle cut strips or raindrop shapes.
4. You will secure the fringe as before only secure using two different pieces at a time.
5. Add a new side until you are all finished and the hat is in a round.
6. Tie the raindrops from the INSIDE of the hat.
7. Roll up the edge of the hat.


Subscribe to:
Comments (Atom)