Wednesday, September 14, 2011

Scotch Brand Products

Fantastic Scotch Products to decorate without harming your walls or furniture!

Today we demonstrated the new Scotch "Restickable Tabs and Shapes".  They are amazing for any of your household, decorating or crafting needs.  The double-sided feature and flexibility of the tabs and shapes are perfect for just about any need...
Secure photos, calendars or even heavier items such as a clock to the wall! 

  • Convert your favorite magnets to stick on your stainless steel refrigerator!  
  • How about hang your children's priceless art, 
  • Secure your gaming sensors or favorite knickknacks. 
  • Cut the tabs to a precise size for any project or need. 
 The possibilities and uses are endless. 
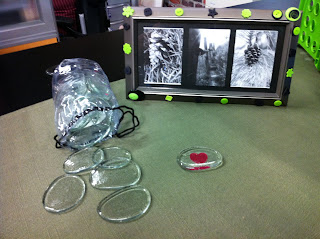
Use the "Restickable Shapes" and some flat glass pebbles to create a fake magnet!  Or use the clear tabs to secure decorations around a frame that can easily be changed for the seasons or holidays!


The best feature....these amazing little gems are RE-USABLE!  What a great value!  No more sticky mess of adhesives, costly replaceable sticky strips, no holes in walls from push pins or the mess of a sticky putty.  These products offer, not only a great convenience, but the money saving ability to be re-used again and again! And I know we all LOVE saving money! 


Another benefit to these fancy little tabs are their strength!!!  The clear TABS can securely hold up to 1 lb and the SHAPES can hold up to 3/4 lb.  Perfect for the college dorm room, school lockers or just about any flat surface that you are needing to "glitz" up!  For the upcoming holiday decorations...these are a MUST! 

You can find these, and other Scotch products, at local merchandise, office, grocery or craft stores.  They retail for $2.99-$3.99 and are a fantastic value considering these are a re-usable product! 


Visit www.scotchbrand.com for more great products and information 


Wednesday, September 7, 2011

Sit-Upon & Chair Organizers

Sit-Upon & Chair Organizers
by Wendy Switzer
Level of Difficulty: Advanced
Hours to Complete: 2 hours


Supplies:
  • Sewing Machine, thread, bobbins, etc.
  • Two 15X28 dishtowels
  • Scissors or cutting mat & rotary cutter
  • Yardstick or measuring tape

Instructions:
  1. Cut your dishtowels according to the pattern pictures below 

  1.  Fold the seat portion in 1/2 and sew the other long side together (wrong sides together). Turn right sides out.
  2. Hem one of the long edges of each of the pocket pieces.  You can use larger pieces and attach elastic to the top edge to create a puffy pocket look. 
  3. Next, sew the large pockets to each of the side pieces.  Make sure your raw/unfinished edge is even with the bottom edge of your side pieces.
  4. If you desire to divide your large pocket into two pockets, now is the time to sew a dividing line to create that look.
  5. Next sew your small pockets onto the bottom edge of the side pieces (on top of the large pockets).  Make sure your bottom edges are all even.  
  6. Sew the top edge of your side pieces and your handle edges inside each open end of the seat piece, about 1/2" in.  
  7. Decorate with embellishments if you desire.
  8. The handles allow you to keep hang up your organizer, neat & full of supplies, when you no longer are using it. 


Side Chair or Under Matress Organizer:
  1. Cut a fabric piece 12X26
  2. Fold up the fabric 6" to create your pocket.  Pin in place
  3. Sew two stitching lines, on your pocket, 4" apart.  This divides your pocket into 3 pockets.
  4. Finish the edges...hem, use bias tape, serge, etc.    


Back of Chair Organizer
  1. Measure across the chair back that your organizer will be used on. Add 3" to that measurment.
  2. Cut a piece of fabric 36"X (measurement of your chair).
  3. Fold over 10" and pin.  This is that fabric than will be on the front side of the chair.
  4. Next cut pieces of fabric to the desired width and size of the pockets you want.  Specific pockets can be created for your individual needs...for student dorm rooms, crafters, office worker, etc.  
  5. Sew the pockets as you did above (arm chair organizer) and finish the edges.  
  6. Decorate as desired.