Wednesday, August 31, 2011

Teen Party Ideas

Teen Party Ideas
by Wendy Switzer


Sweet 16 Party

Supplies:
  • Poster board - black and a main color, 1 piece for every 2 letters in the name
  • Adhesive
  • Balloons
  • Metallic gift wrap
  • Paper gift wrap
  • Cardstock matching poster board colors
  • Tulle
  • Ribbon
  • Party Favors
Instructions:
Banner
  1. Cut each piece of poster board in half.  
  2. Cut the lighter/contrasting color into letters to spell the name of the party guest or occasion.
  3. Adhere the letters onto the black poster board pieces.  Cut around each letter leaving a 1/4"-1/2" border creating a mat around each letter.
  4. Cut smaller letters to finish creating your banner/title/names, etc. 
Favor cake boxes
  1. Cut cake boxes using contrasting cardstock colors...one color for the box and the other for the lid.       I used the Cricut machine, "Tie the Knot" cartridge and the "cake box" shape. 
  2. Punch two holes in the end of the box.
  3. Cut 8" of coordinating ribbon and string through the holes, tying a bow on the outside of the box.
  4. Fill the boxes with goodies or specialty party favors
  5. Stack the boxes in 4-6 rows to create a tower of favor boxes. 
Theme Sandwiches
  1. A fun way to feed a lot of teens is fix sandwiches! Not only regular bread sandwiches...but create bread that goes along with the party theme.
    • Shape dough into the birthday number...sweet 16, 21, etc.
    • Shape dough into a party theme object...baseball, football, princess crown, etc
Decorative Snack Bowls
Dollar stores are a great way to create a fancy look for very little money.
  1. Purchase large bowls and small bowls.
  2. Place the smaller bowls upside down on the table.  Place the larger bowls on top of the smaller bowls. 
  3. Tie a ribbon around the top of the smaller bowl.  Add a party favor or other decor to create a unique look. 


Wednesday, August 24, 2011

Crayon Framed Art

Crayon Framed Art
by Wendy Switzer
Level of difficulty: Easy
Time to Create: 2-3 hours


Supplies
  • Crayons
  • Double sided tape
  • Scissors
  • Canvas fabric or canvas frame
  • Photo Frame (if using canvas fabric)
  • Blow dryer
  • Craft knife
Instructions:
  1. Use your craft knife to slice all the papers around the crayons.  Completely remove all paper from each crayon. 
  2. Place a strip of double sided tape across the top of your canvas work space.
  3. Begin to lay out your crayons in the desired pattern.  Make sure to use dark colors sparingly since they tend to dominate the finished product.
  4. Place canvas onto a baking sheet and place in the oven for 15-25 minutes.  Prop up one end of the baking sheet or off set the oven rack.  This will create gravity for the melting crayons.  You can also set the canvas outside in the sun if it is hot enough. 
  5. After the crayons have begun to melt, use a hair dryer to continue the melting process.  Use a high heat setting with a low or medium blowing setting.  You can use a high blowing setting, but this will tend to make the melted crayon blow or splatter in areas that you do not want it on.
  6. Once you have the desired melted look, you can either continue to melt away the crayons until only the dye from the crayons is left behind, or you can leave the actual wax drips.  
  7. If there are still small pieces of the crayons, you can carefully peel them off of your work surface.  Use the blow dryer to melt the remaining crayon residue to finish off the look.
  8. You can also leave the crayons on the canvas for a unique look. 
  9. Let the wax completely set up again before placing the canvas fabric into a picture frame. 


Wednesday, August 17, 2011

Ribbon Bracelets

Ribbon Bracelets
by Wendy Switzer
Level of Difficulty: Easy
Time to Complete: 1 hour


Supplies
  • Ribbon
  • Silk Flowers
  • E6000 adhesive
  • Brads
  • Velcro
  • Glitter
  • Glue pen
  • Lighter
  • Buttons or large brads
  • Decorative belt buckle
  • Brads & brad setter
Assembly Instructions:
  1. Cut a piece of ribbon that measures the size of your wrist + 2". 
  2. Carefully melt both ends of the ribbon to prevent fraying.
  3. Add velcro to each side of the ribbon for the bracelet closure
  4. Using the glue pen, place a small amount of glue along the outer edges of each petal.
  5. Sprinkle glitter over the petal until all of the edges have glitter accents.
  6. Use E6000 to glue multiple petals together, place a large decorative brad or button in the center
  7. Glue to the middle of the ribbon bracelet and let dry. 
To create a buckled bracelet, simply add the buckle to one of the ends and add 3-5 brads as your sizing holes.  

Wednesday, August 10, 2011

Zipper Crafting

Zipper Purses & Pouches
by Wendy Switzer
Time to create: 1 hour
Level: Beginner


Supplies:
  • Zippers - any size 16" or larger (we used 22" & 36" for the projects pictured above)
  • Ribbon - any size 3/8" or larger
  • Needle
  • Thread
  • Sewing machine (optional...these can be made completely by hand)
  • Scissors
  • Ruler
  • Sewing Pins

Instructions:

Once you have the basic steps down, these instructions will work with any size of zipper and ribbon.  You might want to test it out before sewing by just pinning the zipper to the ribbon first.  
  1. Lay your zipper out in front of you...zipper should be closed, zipper stop to your left and zipper pull to the right.
  2. Begin by rounding the corners of your ribbon with scissors and then to prevent the edge from fraying melt the edge slightly with a lighter or match. 
  3. Measure up 3" from the bottom of the zipper stop.  This is where you will start your ribbon.  Your ribbon will start at your 3" mark and move to your left. (see photo below)

Begin sewing small stitches to secure your ribbon to the zipper edge.  Remember not to sew too close to the zipper or you will have a struggle opening and closing the zipper.  You can use a sewing machine to sew the ribbon to the zipper, but you will need to stop and hand sew each time you come to a turn/corner.

Once you have sewn around the zipper stop, continue all the way up (photo B) towards the zipper pull,  leaving a 4" space before you reach the zipper pull (photo B).  Cut off your ribbon, round the edge and fray prevent as before.  

B

C                                      


Next unzip the zipper


Now go back to the very beginning and wrap the zipper around the ribbon end that you started with.  You will need to do this by hand, pinning it in place helps.


Continue sewing the zipper to the ribbon edge all the way around until you run out of zipper to sew 

Now take the other end of the zipper and wrap it around the other end of the ribbon as you did before.  

You will end next to the other zipper stop.   


Fold the edges of each zipper end in slightly, and secure in place.

Clip off any loose threads and zip up your project...you are finished!  


OPTIONS....
Here are some additional projects we made and the variances we used are listed...


 This zipper clutch was created using a 36" zipper and 1" ribbon.
Create a ribbon rosette by gathering the bottom edge of 12" of ribbon.
Roll the ribbon and stitch the gathered edge together.  Sew to the corner.


22" zipper and 1/2" ribbon.  Also added a loop of ribbon for a handle. 

20" zipper & 1/2" ribbon.  If you follow the basic directions, but use a 20" zipper, 
you end up with a "sour cream" pouch look.


20" zipper and 1/2" ribbon.  Again, the "sour cream" pouch look.  
Add a loop of ribbon for a handle or add 
additional ribbon and buttons for accent as I did above.


Have fun with this! These are perfect for coin purses, lunch money pouches attached to backpacks, unique gift wrapping for jewelry, make up, cell phones, etc. 

See today's show by visiting www.connect2utah.com 
Midway down, in the middle, click on "Craft Projects"
This video it titled: Crafty Chick: Zipper Stuff

Wednesday, August 3, 2011

Tile Trivets & Decor
by Wendy Switzer
KUTV Channel 2
Level: Easy


Use Staz-On ink along the edges of the tiles, as well as stamp the design.


Supplies:


  • Ceramic tile - any size
  • Chipboard
  • Felt or Fun Foam
  • Glue Gun
  • E6000
  • Glitter
  • Staz On Ink
  • Rubber/Acrylic Stamps
  • Clear Acrylic spray
  • Easel
  • Cutting mat
  • Razor blade or craft knife
  • Button magnets - STRONG magnets


There are a number of ways to create a beautiful trivet that can be, not only useful, but a piece of decorative art as well.  


Instructions:

GLITTERED TILES

  1. Clean tile 
  2. If you are using a mosaic tile, decide on the size for your project and cut the remaining tiles away.
  3. Measure the full size of your tile(s) and use that measurement to cut a piece of chipboard and felt/fun foam that is 1/2" SMALLER than your tiles. 
  4. Use glue gun or E6000 to secure the chipboard directly to the back of the tiles.  
  5. Glue the felt/fun foam on top of the chipboard.  This will prevent your trivet from damaging or scratching your table or counter top.  
  6. Use Staz-On solvent ink to stamp images onto your tile.  If you plan on adding glitter to your project, this it the time to apply it.  Shake off any excess and set aside to let dry.
  7. Once your tile is dry, use a glue gun to apply glue into the spaces between the tiles.  While it is still hot/wet apply glitter again. 
  8. Once the glue has hardened, carefully brush away any excess glitter.  
  9. Spray with a clear acrylic.  Set aside and let dry.


You can also use cording, ribbon, yarn, etc. in the tile gap (as shown above)


STAMPED TILES


  1.  Clean Tile
  2. Prepare the back of the tile as you did above (steps 3-5).
  3. Stamp images onto your tile.  Let Dry
  4. Spray with an clear acrylic to seal your image(s).


Magnets

  1. Cut small mosaic tiles apart using your craft knife and cutting mat.
  2. Clean & dry tiles
  3. Prepare the back of the tile as you did above (steps 3-5).
  4. Stamp with desired images
  5. When stamped images are dry, spray with a clear acrylic to seal design.
  6. Use E6000 to secure a button magnet to the back of each tile. 


You can also use acrylics to paint your own design onto the tiles, as shown here.  Add magnets to the back.  


Wednesday, July 27, 2011

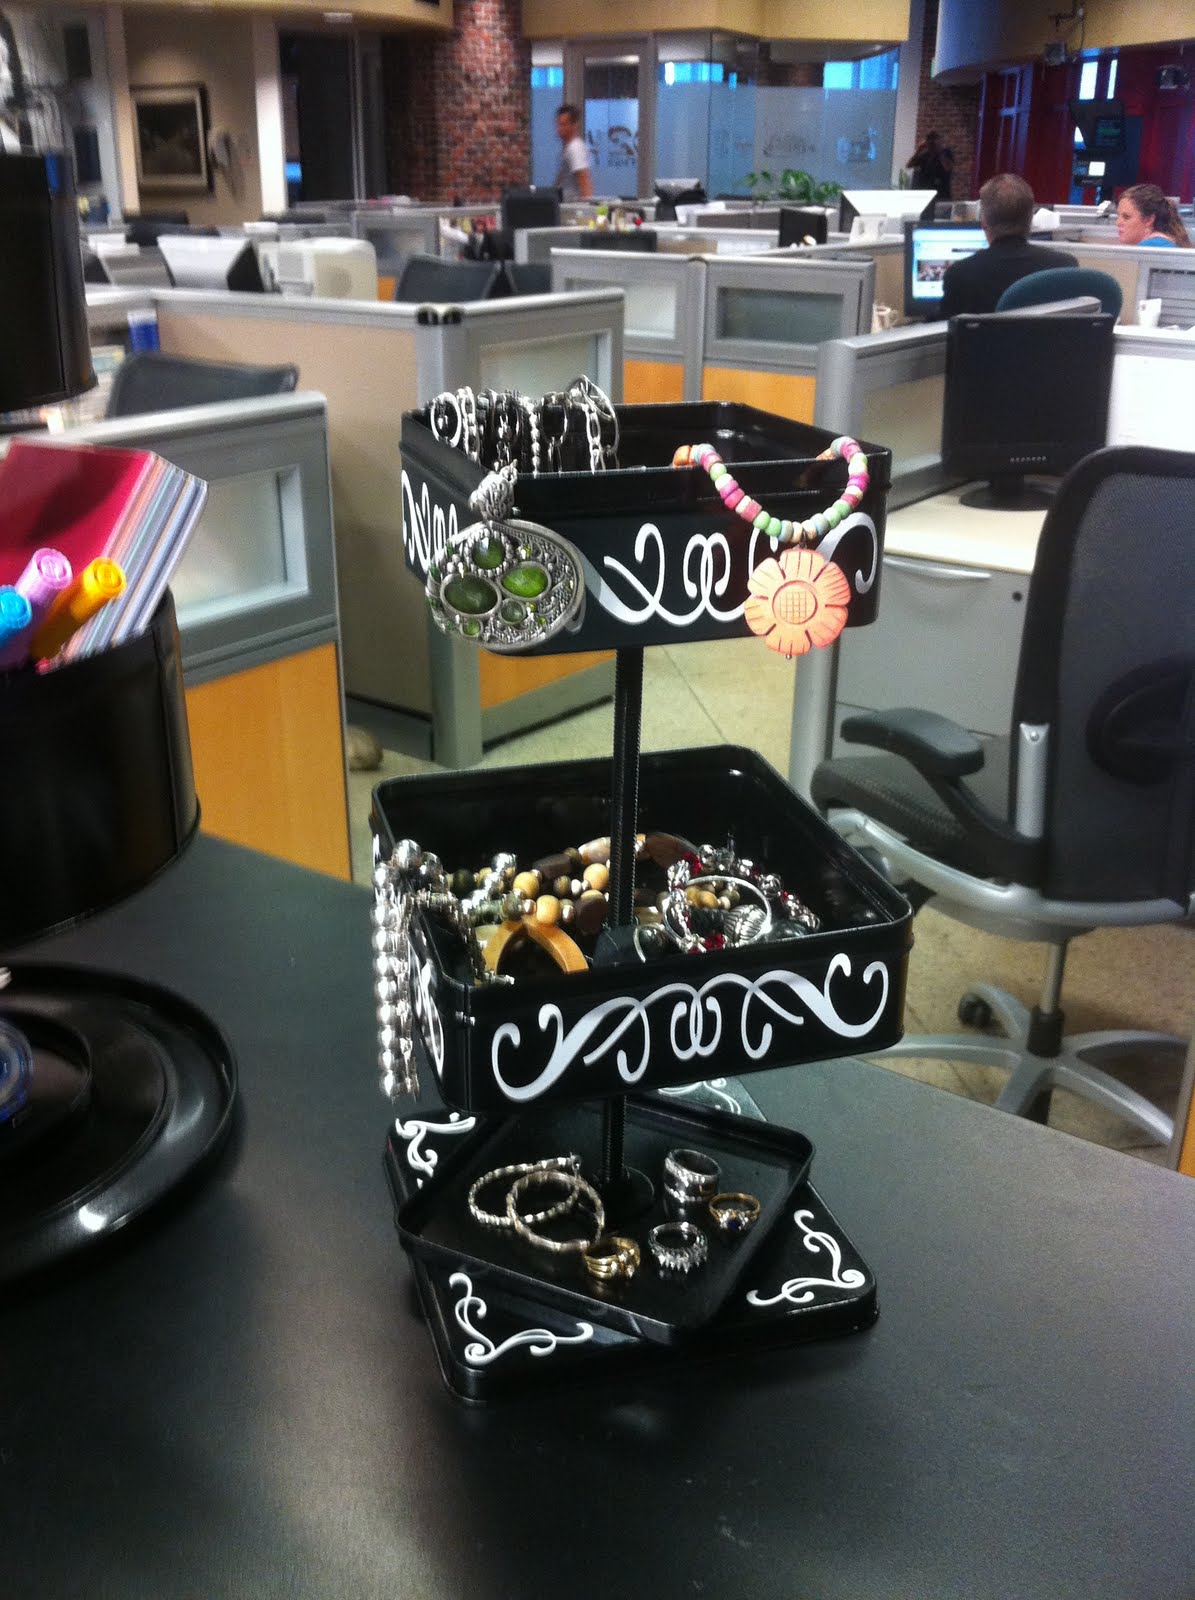
"Straighten-Up" - Tin Tower Organizers

Tin Tower Organizers
by Wendy Switzer
Level: Intermediate
Time to Complete: 4-6 hours

Teen make-up & hair accessory organizer
Square & Circle tins used, two lid bottom, rod top extension with doc clip, paint splatter & vinyl accents


Supplies:

  • Cookie Tins
  • Spray Paint - Primer and color desired
  • Threaded Rod 3/8"- 1/2"
  • Washers & nuts - to fit onto threaded rod
  • Drill & drill bit - size of the threaded rod
  • Flat drill bit - size needs to be the width of the washer
  • Newspaper, marker and pencil
  • Scissors
  • Wood scrap...plywood, pine, etc.
  • Jigsaw
  • E6000

Instructions:

  1. Wash tins and dry completely.
  2. Decide how many tins and lids will be used for your project
  3. Paint tins, lids, washers and bolts with primer and set aside to dry completely. 
  4. Next paint with desired color and allow to try for 1-2 hours (depending on the temperature)
  5. Trace the bottom of each tin onto the newspaper and cut out the circle 1/4" INSIDE of the line.  Fold the paper circle in half and then in half again.  Snip off a small piece of the tip of the "pie" piece of folded paper you have created. 
  6. Place paper circle inside the tin and use a pencil or marker to make a mark onto the tin center using the hole in the center of the paper circle. 
  7. Do steps 5 & 6 for each tin and lid that you will use.
  8. Cut a piece of wood to fit inside the largest lid.  Drill a hole into the wood that goes only HALF way through the thickness of the wood.  The hole needs to be as wide as the washer.  The washer and nut will be recessed into the wood and when the nut is tightened (step 12), it will be flush with the wood so that the base sits level.  This will give your tin tower good stability.   You can also use E6000 to glue the wood into the lid permanently.  I also like to use a bit of E6000 on each nut to make sure it is "locked" into place. 
  9. Drill a hole into the center of each tin piece using the center mark as your guide. You may want to punch a hole in the center of the tin with a nail, first, to give the drill bit something to grab onto and keep your hole centered. 
  10. BOTTOM/BASE ideas:  You can do many things to create your base/bottom.  You will notice that I did not do any of the bottoms the same.  You can use multiple lids to create additional organizing space  as your base.  Turn lids upside down on top of each other, layer lids, etc.  Be creative and design something that will work best for your individual needs.
  11. To begin assembling your tin tower, twist a nut onto the threaded rod and twist it up about 6". Next place a washer onto the threaded rod and then your tin.  The largest (bottom) tin should be placed onto the rod so that the nut and washer are on the INSIDE of the tin.  
  12. Place another washer and then twist on another nut.  Using your wrenches (one wrench on each nut...inside the tin and bottom of the tin) tighten as much as possible.  
  13. Next place the next items in this order...nut, washer, largest tin lid (upside down), wood piece, washer and nut.  
  14. Now with your base complete, you are ready to stand it up and begin assembling the rest of your organizational tin tower.
  15. Assemble the rest of your tower in this order...nut, washer, tin, washer & nut.  This order of items can be used as many times as needed to create the tower height desired.
  16. FINISHING the top:  You can finish off your tower in many ways....1.  You can have a small tin for the top.  2.  You can have a lid as the top.  3.  You can finish off your tower by having the rod extend above your top tin (photo 1A) and glue a large document clip onto the top of the rod.  Let dry over night and this will give you a place to display recipes, photos, reminders, etc.  
  17. Finish off with stickers, vinyl lettering/shapes/names, tin contents, embellishments, etc.

 1A
BLACK: Three tin craft room tower. Two lid bottom and top extending rod with document clip
BROWN:  Three tin planter tower, textured paint to resemble sandstone, one lid for the base

 1B
Two tin organizing tower:  Offset, two lid base, embellished with vinyl filigrees

3A
4 tin craft tower:  Two lid base

4A
Produce/Table top tower: Used "flecking" glitter spray paint, placed the bottom tin on an upside down lid as the base.  Used a small lid as the very top.

Check out www.connect2utah.com to watch the tv demo segment :)

Wednesday, July 6, 2011

Reunion Ideas for all ages!

Reunion FUN!

Here are some great ideas for pulling off a stress free family reunion.  Getting everyone involved with simple activities will provide hours of entertainment for all.  It also provides "busy time" for younger people so those who wish to socialize can do so without much interruption.


Easiest way to Tye Dye tshirts
Tye dying tshirts is a great reunion past time, but can be a daunting and messy task.  Here is a simple and mess free way to achieve similar results.


Supplies:

  • t shirts
  • Rit dye (multiple colors)
  • small spray bottles (your local Dollar stores carry the perfect size)
  • table covering/newspaper
  • paper stencils (optional) covered with clear acrylic spray
  • rubber bands
Instructions:

  1. Cover table with plastic, newspaper or paper table covering.
  2. Scrunch t shirt together
  3. Spray with dye
  4. You can repeat steps 2 & 3 as many times as necessary or to achieve the look desired using multiple colors.
  5. You can also use pattern stencils made from paper (spray with clear acrylic spray to make them durable for multiple uses)
  6. You can also take sections of the t shirt and tie with a rubber bands.  Spray with the dye until the section is saturated.  Remove rubber band and you have a unique look and design. 


Boondoggle
This is a fun activity that has been around for generations.  So many fun and unique new ways to keep you busy for hours.  Absolutely THE best patterns for Boondoggle is http://boondoggleman.com/.  Amazing patterns EASY instructions and so simple that kids can follow along!


Supplies:

  • Rexlace or plastic lacing
  • Design instructions from website mentioned above
  • key chains, safety pins, etc. (things to hook to your boondoggle)
Instructions:
  1. Follow instructions and create unique and fun boondoggle crafts.

Friendship Bracelets

These are a fun and easy activity for ALL ages.  A great activity to pass the time, have something to do while just sitting around, etc.  Best patterns are available at  http://www.peacepattern.info/ or http://www.how-to-make-jewelry.com/friendship-bracelet-instructions1.html


Supplies:
  • Embroidery Floss - multiple colors
  • Safety pin 
Instructions:
  1. Select pattern and number of colors of embroidery floss desired/needed to create your bracelet.
  2. Secure floss to safety pin and follow pattern


Ancestor Sharing
Doing some research of ancestors can be, not only fun, but extremely educational for everyone involved.  Bring photographs, journals, family stories, etc. to display and share.  Learning about your family history can be a great way to connect with everyone attending the reunion, regardless of age.

Great sites for family history:  https://www.familysearch.org/   OR   http://www.ancestry.com


Personalized Table Cloth

Make an easy camping table cloth with sentimental value and a personalized touch.


Supplies:
  • twin sheet
  • fabric crayons, markers or pens
  • iron to set designs
  • sewing machine or serger
Instructions:
  1. Remove all the folded edges off of the sheet and serge or finish the edges.
  2. Have everyone create their own unique art work on the cloth.
  3. Add their initials or names next to their art work.  You can also add the age and date at well.
  4. Set with an iron. Ready to use!